Conditional Generative Adversarial Nets 前言 CGAN跟GAN差別就只是差在加入了條件(Condition),作用是負責監督GAN ,讓我們可以控制GAN的輸出。通過給GAN中的Discriminator跟Generator增加一些條件性的約束,來解決GAN對於較大圖片的訓練太自由的問題。
而這個條件可以是任何類型的資料 ,例如label、tag甚至是圖片等等,目的是有條件的監督Generator生成的資料,使Generator生成的結果不是隨機的,而是符合設定條件的。
以下是CGAN的Objective Function:
$$
\min_{G}\max_{D}V(D,G)=\mathbb{E}_{x\sim p_{data}(x)}[\log D(x|y)]+\mathbb{E}_{z\sim p_z(z)}[\log (1-D(G(z|y)))]
$$
從目標函數中可以看到,條件y不只是帶入了Discriminator的輸入中,也融入了Generator的輸入中。
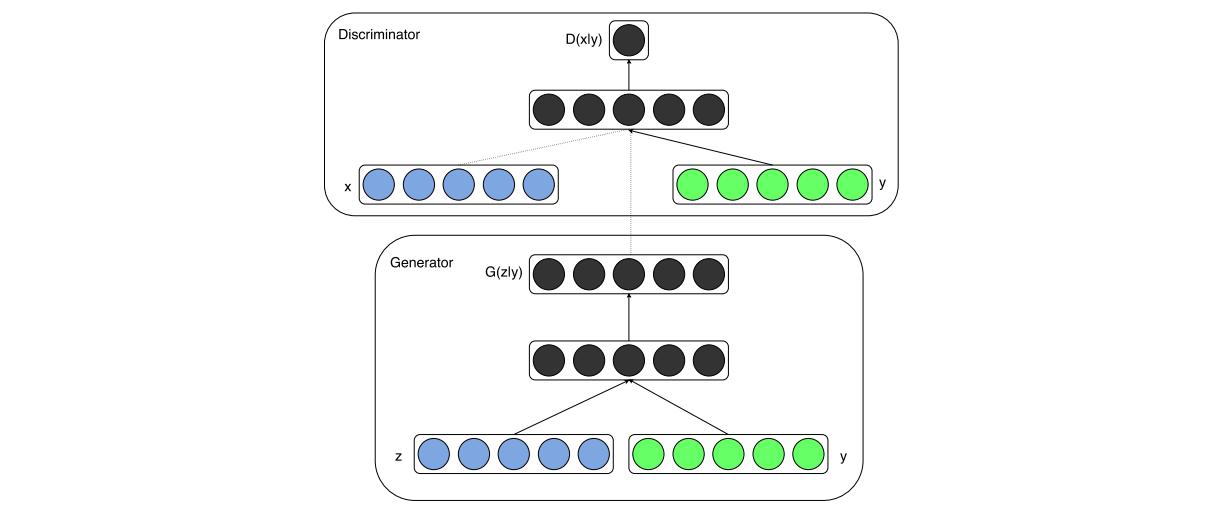
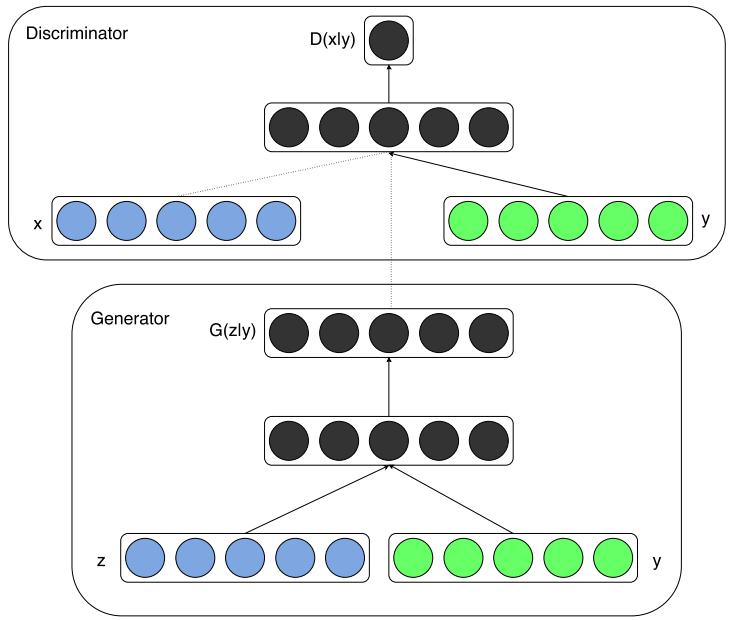
Network Architecture 以下是整個網路的架構,可以看到整個架構非常簡單:
實作所使用的資料集是MNIST手寫數字圖片資料集,所以x代表的是輸入的圖片而y則是這張圖片所代表的數字,在這裡會用one-hot encoding的方式轉換成10維的資料,z則是100維度均勻分布的noise。
Discriminator使用了一種叫做Maxout的網路架構(詳細的架構會在實作中提到),將輸入的圖片轉化成1維的陣列,然後進入pieces=5、units=240的Maxout網路層,而標籤則是進入一個pieces=5、units=50的Maxout網路層,然後簡單的把輸出Concatenate在一起再進入一個一個pieces=4、units=240的Maxout網路層,最後街上1維的全連結層加上Sigmoid的Activation Function。
Generator則是直接將noise跟label個別丟入一個全連結層,配上relu的Activation Function,將個別的輸出Concatenate後再進入兩個全連結層,最後的輸出維度則是圖片的長乘以寬,將其重新排列即可得到Generator的輸出圖片。
網路架構 參數宣告 跟上一篇一樣,使用absl這個套件來控制儲存路徑和訓練時的一些參數:
1
2
3
4
5
6
7
8
9
10
11
12
13
14
from absl import appfrom absl import flagsfrom absl import loggingFLAGS = flags.FLAGS flags.DEFINE_string('LOG_PATH' , 'logs/' , 'path to log_dir' ) flags.DEFINE_string('MODEL_PATH' , 'models/' , 'path to save the model' ) flags.DEFINE_integer('num_classes' , 10 , 'the number of classes' ) flags.DEFINE_integer('noise_dim' , 100 , 'noise dimension' ) flags.DEFINE_integer('BATCH_SIZE' , 256 , 'batch size' ) flags.DEFINE_float('lr' , 2e-4 , 'learning rate' ) flags.DEFINE_integer('epochs' , 150 , 'epoch' )
資料集 跟上一篇比較不一樣的是在建立訓練集的時候使用了label的資料,並在使用前轉換成10維的one-hot code,而在noise的地方也是都使用固定的noise當作網路的輸入,用來觀察訓練時圖片的變化,另外增加了NOISE_LABEL,使用了20組0~9的數字再將其轉化成1維,最後進行one-hot encoding:
1
2
3
4
5
6
7
8
9
10
11
12
13
14
15
16
import tensorflow as tffrom tensorflow.keras.datasets.mnist import load_data[(train_x, train_y), (test_x, test_y)] = load_data('mnist.npz' ) train_images = train_x.reshape(train_x.shape[0 ], 28 , 28 , 1 ).astype('float32' ) train_images = (train_images - 127.5 ) / 127.5 train_dataset = tf.data.Dataset.from_tensor_slices((train_images, train_y)) train_dataset = train_dataset.shuffle(60000 ) train_dataset = train_dataset.map (lambda x, y: (x, tf.one_hot(y, FLAGS.num_classes))) train_dataset = train_dataset.batch(FLAGS.BATCH_SIZE) NOISE = tf.random.normal([10 *20 , FLAGS.noise_dim]) NOISE_LABEL = tf.concat([tf.range (0 ,FLAGS.num_classes)]*20 , axis=0 ) NOISE_LABEL = tf.one_hot(NOISE_LABEL, FLAGS.num_classes)
Maxout Network Maxout Network是透過將全連結層分割成k塊,每一塊輸出的每個維度都和其他塊輸出比較大小,針對每一維度保留最大的那一塊,最後輸出的維度為units維,這樣可以減少在訓練網路的時候發生Gradient Vanish的情況:
1
2
3
4
5
6
7
8
9
10
11
12
13
14
import tensorflow as tffrom tensorflow.keras.layers import ( Concatenate, Dense, Dropout, Reshape, ) def Maxout (x, units, k, activation, drop_prob=0.5 ): x = Dense(k * units, activation=activation)(x) x = Dropout(drop_prob)(x) x = Reshape((k, units))(x) x = tf.reduce_max(x, axis=1 ) return x
Generator跟Discriminator的網路架構 整體的網路架構如同上面所敘述的一樣,要注意的是Generator跟Discriminator都比GAN多了一個輸入,用來當作條件來監督模型:
1
2
3
4
5
6
7
8
9
10
11
12
13
14
15
16
17
18
19
20
21
22
23
24
25
26
27
28
29
30
31
32
33
34
35
36
37
38
39
import tensorflow as tffrom tensorflow.keras import Modelfrom tensorflow.keras.layers import ( Concatenate, Flatten, Dense, Reshape, Input, ) from absl.flags import FLAGSdef Dis_Net (): x = inputs_x = Input([28 , 28 , 1 ]) x = Flatten()(x) x = Maxout(x, units=240 , k=5 , activation='relu' , drop_prob=0.5 ) y = labels_x = Input([FLAGS.num_classes]) y = Maxout(y, units=50 , k=5 , activation='relu' , drop_prob=0.5 ) x = Concatenate()([x, y]) x = Maxout(x, units=240 , k=4 , activation='relu' , drop_prob=0.5 ) output = Dense(1 , activation='sigmoid' )(x) return Model([inputs_x, labels_x], output, name='Discriminator' ) def Gen_Net (): x = inputs_z = Input([FLAGS.noise_dim]) x = Dense(256 , activation='relu' )(x) y = labels_x = Input([FLAGS.num_classes]) y = Dense(256 , activation='relu' )(y) x = Concatenate()([x, y]) x = Dense(512 , activation='relu' )(x) x = Dense(28 * 28 * 1 , activation='tanh' )(x) output = Reshape((28 , 28 , 1 ))(x) return Model([inputs_z, labels_x], output, name='Generator' )
Gen & Dis Net, Optimizer and Loss Function 這裡所使用的Optimizer跟上一篇大同小異,唯一不太一樣的點在於兩個模型的learning rate這次設定成一樣。而Loss Function則是跟上一篇一樣,具體的可以去查看Github上的程式碼,這邊就不再列出。
訓練過程 計算loss、更新網路的過程、紀錄所需的各個參數等等。
Each Epoch Training 跟GAN的訓練方式一樣,不過要注意網路的輸入要加上label的資訊:
1
2
3
4
5
6
7
8
9
10
11
12
13
14
15
16
17
18
19
20
21
22
23
24
25
@tf.function def train_step (models, opts, images, labels, loss ): Generator, Discriminator = models G_opt, D_opt = opts noise = tf.random.normal([images.shape[0 ], FLAGS.noise_dim]) with tf.GradientTape() as gen_tape, tf.GradientTape() as disc_tape: generated_images = Generator((noise, labels), training=True ) real_output = Discriminator((images, labels), training=True ) fake_output = Discriminator((generated_images, labels), training=True ) gen_loss = generator_loss(fake_output) real_loss, fake_loss = discriminator_loss(real_output, fake_output) disc_loss = real_loss + fake_loss loss[0 ].update_state(real_output) loss[1 ].update_state(fake_output) loss[2 ].update_state(gen_loss) loss[3 ].update_state(disc_loss) gradients_of_gen = gen_tape.gradient(gen_loss, Generator.trainable_variables) gradients_of_dis = disc_tape.gradient(disc_loss, Discriminator.trainable_variables) G_opt.apply_gradients(zip (gradients_of_gen, Generator.trainable_variables)) D_opt.apply_gradients(zip (gradients_of_dis, Discriminator.trainable_variables))
Whole Training Process 將前面所寫的兜在一塊就是整體的訓練過程:
1 2 3 4 5 6 7 8 9 10 11 12 13 14 15 16 17 18 19 20 21 22 23 24 25 26 27 28 29 30 31 32 33 34 35 36 37 38 39 40 41 42 43 44 45 46 47 log_path = os.path.join(FLAGS.LOG_PATH) if not os.path.exists(log_path): os.mkdir(log_path) csv_path = os.path.join(log_path, 'loss.csv' ) with open (csv_path, 'w' ) as f: f.write('epoch,Real_P,Fake_P,Gen_loss,Dis_loss\n' ) format_str = '{:5d},{:.6f},{:.6f},{:.6f},{:.6f}\n' dis_r_p = tf.keras.metrics.Mean() dis_f_p = tf.keras.metrics.Mean() G_loss = tf.keras.metrics.Mean() D_loss = tf.keras.metrics.Mean() loss = [dis_r_p, dis_f_p, G_loss, D_loss] Generator, Discriminator, G_opt, D_opt = setup_model() models = [Generator, Discriminator] opts = [G_opt, D_opt] for epoch in range (FLAGS.epochs): start = time.time() for image_batch, label_batch in tqdm(train_dataset.as_numpy_iterator()): train_step(models, opts, image_batch, label_batch, loss) with open (csv_path, 'a' ) as f: f.write(format_str.format (epoch, loss[0 ].result().numpy(), loss[1 ].result().numpy(), loss[2 ].result().numpy(), loss[3 ].result().numpy())) loss[0 ].reset_states() loss[1 ].reset_states() loss[2 ].reset_states() loss[3 ].reset_states() generate_and_save_images(Generator((NOISE, NOISE_LABEL), training=False ), epoch + 1 ) if (epoch + 1 ) % 15 == 0 : Gen_save_path = os.path.join(FLAGS.MODEL_PATH, 'Generator' ) Dis_save_path = os.path.join(FLAGS.MODEL_PATH, 'Discriminator' ) Generator.save_weights(Gen_save_path) Discriminator.save_weights(Dis_save_path) logging.info('Time for epoch {} is {:.3f} sec' .format (epoch + 1 , time.time()-start)) time.sleep(0.2 )
Result 以下是訓練過程中Discriminator跟Generator的Loss:
Discriminator判斷真假的機率變化:
每一個Epoch都針對0~9用固定的noise生成20張圖片:
結論 CGAN是用於給定條件然後透過GAN來生成圖片的基礎,透過實作讓我了解論文裡作者的思路,以及增加不同網路架構的知識。
Github:GAN-02 Conditional Generative Adversarial Nets
